Reflooring: Pulling The Carpet, Found Some Subfloor Rot

On my second day working on reflooring our motorhome, I drove the rig home so that I could plug into the electric. Then, I went to town on pulling the carpet up from the rest of the rig.
At this point, all the carpet is up except for the doghouse cover, a little section right in front of the doghouse, and the main slideout. I’ve already looked at the carpet on the slideout and it appears it will be super easy to pull out once I have removed the couch and dinette.
Pulling the carpet was the same as the bedroom. Just cutting around the edge with the utility knife and yanking. In some areas, I cut right through the middle so that I could pull the carpet in pieces.
While some rigs use a TON of staples to hold down the carpet, mine wasn’t bad at all. Some staples around the edges, but most of the carpet was just sitting there. Yay for me. 🙂
Now, what wasn’t yay for me is that I found some rotted subfloor.
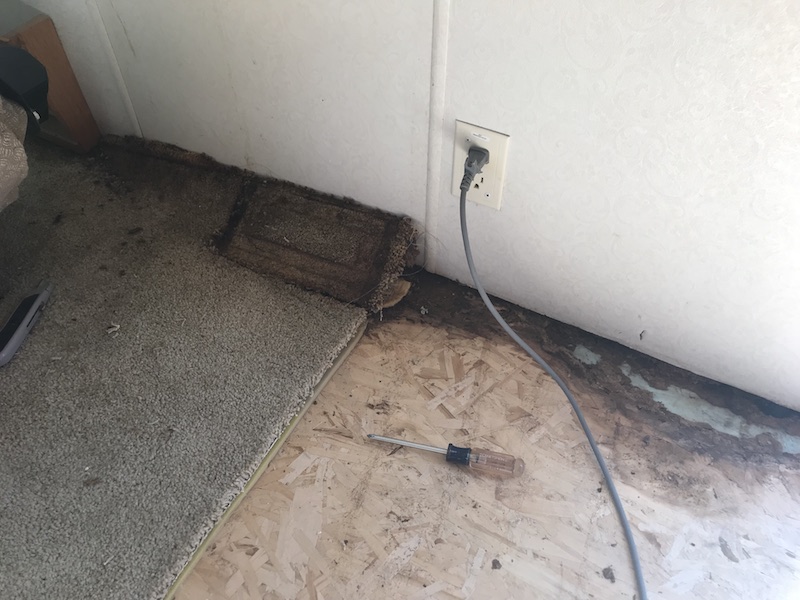
It wasn’t a big surprise because I could tell there was some previous water entry in these spots before. The carpet was a bit discolored and stiff. The spots I found were along the wall.
Water can come in from the damnedest places in these motorhomes. For example, I found a little rot in the back bedroom right beneath the window. Clearly, there was a leak issue in the past with that window. Up front, I found some rot along the edge moving from the entry door forward all the way through to the passenger seat. In this case, it might have been a window. It could have also been an issue with the awning rail on the outside since I know this rig had an issue with that in the past.
Either way, the rot is obvious. Those sections of subfloor were black and weak. I could easily pull chunks of it with my fingers or poke it with a screwdriver. There was no structural integrity there anymore.

My plan to fix this subfloor rot is actually pretty simple:
- Cut it out. I’ll just use my rotary saw and set the blade depth to the thickness of the subfloor so that I don’t penetrate deeper. And I’ll cut it out in nice square pieces.
- In those square holes, I will insert new wood cut to that exact size.
- I’ll attach the new pieces and seal the wood with some epoxy.
- I’ll cheer. 🙂
That will make the subfloor nice and solid in those spots again, then the new floor will go over it and you’ll never be able to tell.
Lastly, in this video, I’m still evaluating that laminate and how it is attached. Should I pull it out? Should I just leave it there? I mean, it isn’t exactly horrible, however that would mean I’d have to recarpet much more than I was originally planning and forgo my vinyl planks.
We’ll see how that goes. 🙂
Against the outside wall you may need to add a 2x for support under the cut floor. Floor are normally run first and rigth to the edge. I am facing the same issue in my 2006 Jayco.
In my case, I don’t. Those videos will be going live soon, but since my unit is a Class A and not a trailer, it is built a little differently. The floor is a sandwich structure, so right under the wood is a solid insulation layer. So, no new support beams are necessary.