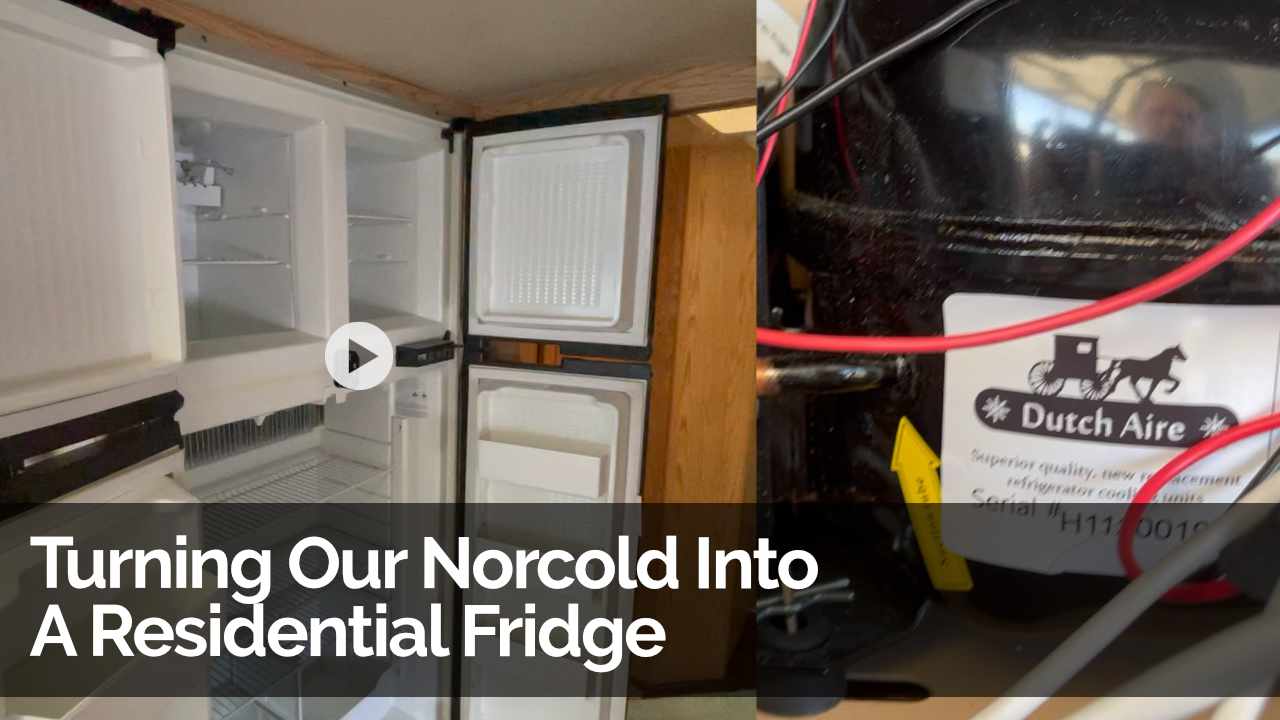
Converting My Norcold Refrigerator To A DC Compressor: Real World Install Series
In my last post, I gave you my reasoning for why I decided to replace the cooling unit on my Norcold refrigerator with a new compressor-based system from JC Refrigeration. In this post, I’m going to show you how it went. 🙂
Yes, that’s right. The job is now pretty much completed and the new system is working.
As I went, I documented the process in video format recorded from my trusty new iPhone 12 Pro Max. And it ended up being an 8-video series (which you can view above).
My goal was not to provide a “how to” on this conversion. For two reasons:
- They make their own install video and provide documentation. They’re the experts, so best to follow them.
- I’ve never done this before, so I was sure to run into issues and confusions.
And so on that note, my goal with this series was to show what this job is REALLY like. 🙂
When you embark on a more advanced DIY job like this, it usually doesn’t look like the pictures. 🙂 We don’t live in an ideal world… and things don’t always go according to plan.
So, this series will show the raw experience as best as I can. You will see me have to figure out some things that came up. Because… that’s real life.
Watch The Videos
You can watch the full series as a playlist right on Youtube or up above if you’re on the blog. Here are individual links to the videos if you want to jump around:
- Norcold Compressor Conversion (Part 1 of 8): Assessing The Job
- Norcold Compressor Conversion (Part 2 of 8): Removing The Old Cooling Unit
- Norcold Compressor Conversion (Part 3 of 8): Installing The New Unit And A Potential Problem
- Norcold Compressor Conversion (Part 4 of 8): Problem With The Drain Hose (Of All Things!)
- Norcold Compressor Conversion (Part 5 of 8): This Job Just Got More Interesting
- Norcold Compressor Conversion (Part 6 of 8): Running New Wiring To The Coach Battery
- Norcold Compressor Conversion (Part 7 of 8): Wrapping Up Loose Ends
- Norcold Compressor Conversion (Part 8 of 8): Final Thoughts On Doing This Myself
Now, I’m not going to write up every single thing I did. The videos sort of show you what happened. But, I wanted to summarize some things that may be helpful to others looking to do a similar upgrade.
JC Refrigeration Documentation (And How I Would Make It Simpler)
So, as mentioned, JC Refrigeration has walkthrough videos on how to perform this upgrade. Now, keep in mind…
They do this all the time, so their video makes it look super easy and fast and with no complications. While it might work like that in some cases, there are usually things that come up that just look different than the video. That was certainly the case with me.
Secondly, JC Refrigeration is a typical small company and it is run by people who do great work… but aren’t particularly internet savvy. They also are not exactly great documentation creators. What I mean is…
- There were no written step-by-step instructions. Just the video.
- They issued updates and clarifications as additional videos and information was spread out. You had to skip around different videos.
- The videos were not embedded anywhere, but were instead spread around as unlisted Youtube videos or raw MP4 files in their WordPress media library. Only way to find it was to scan a QR code from their paperwork.
So, information was spread around. It really helped to go through it all before doing anything so you can get the “big picture”. Plus, you have to bring some common sense to the table here… because their documentation is definitely not a simple step-by-step approach.
If I were to give them some recommendations, it would be:
- Have pages on the website with the videos embedded and all information needed all on one page (including easy access to contact them for support). They do have one, but they need to embed Youtube videos so it is larger.
- Provide written, step-by-step documentation for people who don’t want to sit there and hit play on a video and have to pause it every few seconds while they go do what’s required.
- Re-record the video so it is updated and everything is in one place.
- Break up the videos into phases. One for removal (since it is always the same). Then, different ones for HVAC versus Hybrid.
What Looked Different For Me Than In The Video
JCR produced a video to show how to install their cooling unit. It is pretty much the perfect scenario, without complications, and performed my people who it every day.
Real life looks a little different. 🙂 And here are a few ways…
Extra Parts
Their install video showed no black recall box nor any ice maker. Both of these devices mean extra wiring in the back.
Now, the black recall box that is meant to keep Norcolds from catching on fire isn’t going to be necessary anymore. So, I simply removed it and all the wiring for it.
The ice maker is obviously something you want to put back. It will continue to run off 120V power even after the conversion. It will need to be removed out of the way, however, in order to switch out the cooling unit.
I would highly recommend taking some photos of the wiring before removing anything. Also, take a few notes and/or put labels on the wires so you know what wires go into which connectors on the ice maker valve.
It Wasn’t A Perfect Fit
As you will see in the video series, my new cooling unit didn’t seem to fit perfectly on the back of the Norcold box. While I was able to get all the screw holes to align, the metal framing of the unit kept it from having complete contact on the back of the box.
Long story short, I had a gap. While everything was sealed and apparently as it should be, the cooling fins were inset back a bit.
When this happened, I was concerned this would present a seal problem and affect how well the unit works. But, after exchanging emails with JR (and I also sent a quick video showing the issue), he said it shouldn’t be a problem. In fact, he says it happens to them sometimes, too.
But, they sure don’t show that in the install video. 🙂
The Fridge Is VERY Heavy
If you’re going to DIY this, be prepared to have to get the fridge out of the hole and, even worse… to put it back.
In their video, they sorta skip over that part. 🙂 It almost reminded me of the old Bob Villa home improvement show when he never had a single wrinkle in his clothing during the entire job. 😉
In reality, the fridge is heavy. Really heavy.
And, in my case, I had to lower it to the floor since I have a furnace below the fridge. Getting it back in meant lifting it back into place. It is a really tight fit, for one. Plus, I only had my wife available to help me.
I ended up using a jack and some boards of wood to lift the fridge into place. You’ll see in the video.
I Managed To Kink Up The Drain Hose
Your Norcold fridge has a drain line that leads from the inside of the box out to the outside. The purpose of that line is to allow condensation to drool out and into a little drain pan.
In their install video, this drain line was pretty much an afterthought. Just poke it through, hold it tight as you lower the new cooling unit into place.
Well, somehow… we managed to kink the cable up in there. In between the cooling unit and the back of the fridge box, the cable had kinked up to the point where nothing could flow through it. This came to light the moment I went to feed the power leads for the fan down the drain line so I could connect it to power. It simply wouldn’t go.
Well, in my case, I ended up yanking the cable out (and creating a new, small hole in the back of the fridge). Then, since the old cable was short and dirty, I picked up a new 1/2 inch vinyl drain tube from Lowes to use as a replacement.
I sent the new line through there and sealed both sides with spray foam.
Yes, you can buy a new drain line from Norcold but there’s no point. A simple vinyl tubing from Lowes (1/2 diameter, 3/8 inch interior diameter) worked just fine.
Advice To Make A DIY Job Easier
Now that I have completed the job, here’s some quick advice to save yourself some trouble:
- Definitely take a lot of photos before disconnecting wires. Perhaps even slap some labels on some of them. This will help tremendously in re-connecting things because otherwise it can seem like a huge mess of wires.
- As you secure the new cooling unit into place, be aware that the screw holes may not align properly. In my case, I was able to manipulate things around and get it to work. In a few instances, I had to send the screw through at a new point and make a new hole. Don’t create new holes in the cooling unit, but it is OK if you need to do so in the back of the fridge.
- The important thing is that you have an airtight seal between the cooling unit and the fridge box. Even if there’s a little spacing back there, as long as the cooling plates and fins are in contact and everything is sealed from the outside, it will work fine.
How Is The New Unit Working Out?
As of this writing, the job is complete and I’ve been out for a couple of nights with the new refrigerator.
The unit is working beautifully.
During this small trip, I had the refrigerator on a cooling setting of 5 (out of 9). The fridge temp was running around 34F (give or take) and the freezer was around -8F (give or take).
The new cooling fans that came with the unit are doing a great job of air circulation and keeping condensation and frost from building up.
The fridge sounds different now. A slow, steady hum more like a residential fridge. And the interior fans make a bit of noise as well. It isn’t loud, by any means. But certainly more noticeable than the old cooling unit (which made no noise at all unless it was on LP).
All in all, I’m quite happy with the upgrade.
It is also nice to now be completely immune to stupid recalls or risk of fire. And I’m also not going to be as concerned about opening the door of the fridge because I know this new unit has much faster temperature recovery. I expect my food will stay good longer now because it is running cooler than the Norcold unit was even capable of.
I also suspect I am now done with the days of my fridge shutting down in hot weather while driving. I think that was a problem unique to the Norcold and the recall box that was attached. Plus, come to find out, my cooling unit didn’t even have a fan on it. Amazingly.
Anyway, if you have any questions, post them below and I’ll get back to you in the comments. 🙂


Thanks for the “real” information on changing to the JC Refg compressor. ( I’m surprised you’re from Florida … having such real and honest appraisal of the task ) I’m ordering our conversion kit today.
Thanks, and have a blessed day!
Thank you for all the information! We are doing the conversation tomorrow.
Appreciate the time and effort you went through to document this conversion. Well done. Again.. thank you.
Thank you for all your documentation on this project. I need to do this for my NorCold. It’s having issues with the recall box. Or it’s really a heat issue and I need to have it repaired. Will be ordering from JC in the morning.
Not sure why you have not received any comments yet, but nice job on documenting the install process for your fridge upgrade. I saw enough to say I would probably not try it myself. Not that I could not do it … just getting old and tired. Ha. It does look like an upgrade I would like to have sometime. Our 2006 Norcold is getting tired. Thanks for taking the time to share you impressions and to document the project!
Yeah, it wasn’t for the faint of heart. But, I learn things every time I do something, so I don’t mind.